

Using a Genetic Algorithm to Find Your User's Ideal Theme
Because, why the heck not?!


Finding the ideal color combination for a theme inside a particular app can be a daunting task, especially if you decide to let your users pick their own colors. Of course, you could say that "if they like it like that, why change it?", right? But how long does it take them to arrive at the "perfect" combination?
How many iterations will they go through until they find their "ideal" theme? It's impossible to say, but easy to estimate if we keep it high level.
The answer is: A LOT.
What if you could give them a hand speeding up that process? What if based on their preferences you could provide recommendations that made sense instead of just letting them play with the whole array of possibilities?
The whole point of this idea is to provide "intelligent" suggestions for your users to decide faster which is the ideal color combination for your app. Notice the quotes though, I'm using the word "intelligent" loosely here, since I'm not implementing any kind of AI, instead, I'm going to be mimicking how nature works when two organisms make the nast... err, reproduce. I'll be using a genetic algorithm to help a person figure out their best theme much faster.
If you're interested in how this works, keep reading!
What are Genetic algorithms?
A genetic algorithm deals with a way to find the best solution following the process of evolution that nature has been using for millions of years already. Of course, in the process of coding the solution, I'll be oversimplifying some terms, this is, after all, an experiment in software development, not biology.
That said, when two organisms reproduce, their DNA mixes to form a new offspring that is composed of its parent's genetic makeup, but also, it has some unique features. Not only that, but this new individual could also be the result of a small mutation during conception. So it also has the possibility of bringing a brand new feature to this world in the form of a different hair color, an extra eye or telekinetic abilities, who knows?
The point is that each offspring is the result of a combination of two parents and a little bit of, what we would call "noise" or randomness thrown in for good measure.
Once this new individual is let loose into the world, nature again will take care of measuring how well it performs. Or put another way, does it live long enough to reproduce and pass its unique genetic makeup down to its own offspring? Or is this particular combination not good enough and will perish before "persisting" a portion of its genetic code?
While a huge oversimplification, especially if compared to our own lives, we can use this way of thinking to come up with a way to solve our theming problem.
Let's look at that now.
Applying genetic algorithms to our problem space
We're looking for a way to find the best theme for a user, right? Then we can think about our "themes" as our population. We'll be creating a population of themes, each one with its own genetic makeup, and we'll implement some code that takes care of:
- Breeding them, to come up with offspring.
- Measuring their "worth" or "performance" in the problem space to understand who gets to live and who gets to die.
- Go back to breeding again.
But we first need to define a few things, like what makes a theme "worth it" of reproduction? Or how do we give each theme its own genetic composition? So let's get deeper into the actual problem.
Looking at themes
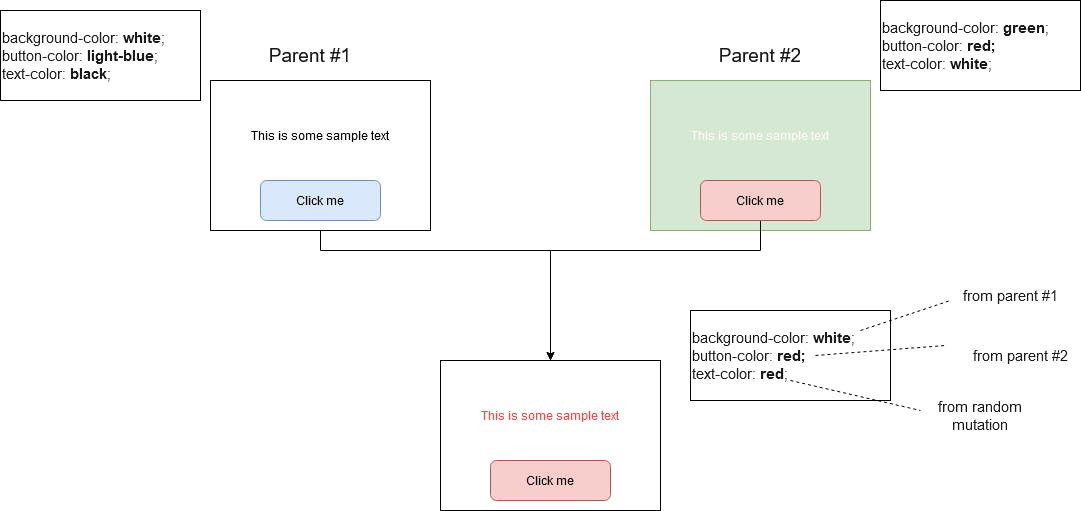
A theme is nothing more than a set of configuration options, so we'll assume that the full set of these options makes up the theme's DNA. Which in turn makes each of these individual options a different gene.
That means that when we implement our breeding code, we'll make sure to mix the options of each theme based on a per-gene basis.
The following diagram exemplifies the breeding process of two themes:
Afterward, we'll have to measure the new offspring's performance to understand if it'll have a "healthy and long life" (i.e it'll get to reproduce) or if it'll "die a terrible and sudden death" (i.e it will be deleted).
How do we measure the performance of a theme? Well, there is no surefire way of doing this, but you generally have to find a way to assign a score that shows how close or how far away is the offspring from its goal. In our case, our theme's goal is to be liked by the user. For that, we'll first have to ask the user to tell us what they like. Otherwise, we won't know.
Once they have, let's say, selected a few random themes they find "interesting", we'll calculate our far away our generated offspring are from them. Then we'll take the top 50% of our population and we'll inter-breed them to create, ideally, better offspring.
After this, both the other 50% and the parents will die off, and we'll generate a new 75% random population to bring new genetic material and avoid the problems that the royals had back in the day when they married their cousins and their own children: making genetic defects stronger by not allowing outside influences from different gene-pools.
The following diagram shows this process visually with just a few themes:
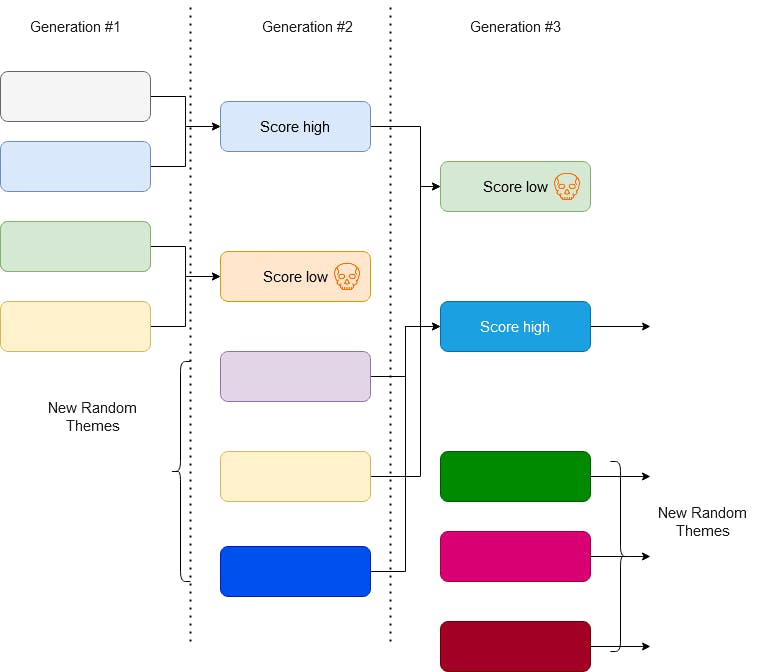
Each new generation is expected to have some better solutions, but at the same time, random new ones to either spark creativity in the user, or at least foster new combinations that weren't possible before.
With this, you now know the basics to understand the code I'll be showing, so let's move into the actual implementation of this.
Implementing our algorithm
To implement this, instead of creating a brand new theme selector app, I'm going to take Tapas Adhikary's theme builder repo and I'm going to butcher it by removing what I don't need and adding my cursed code into it (sorry buddy!). I find this process a lot faster than writing my own application from scratch, but you're free to do whatever you want.
This is what the end result is going to look like:
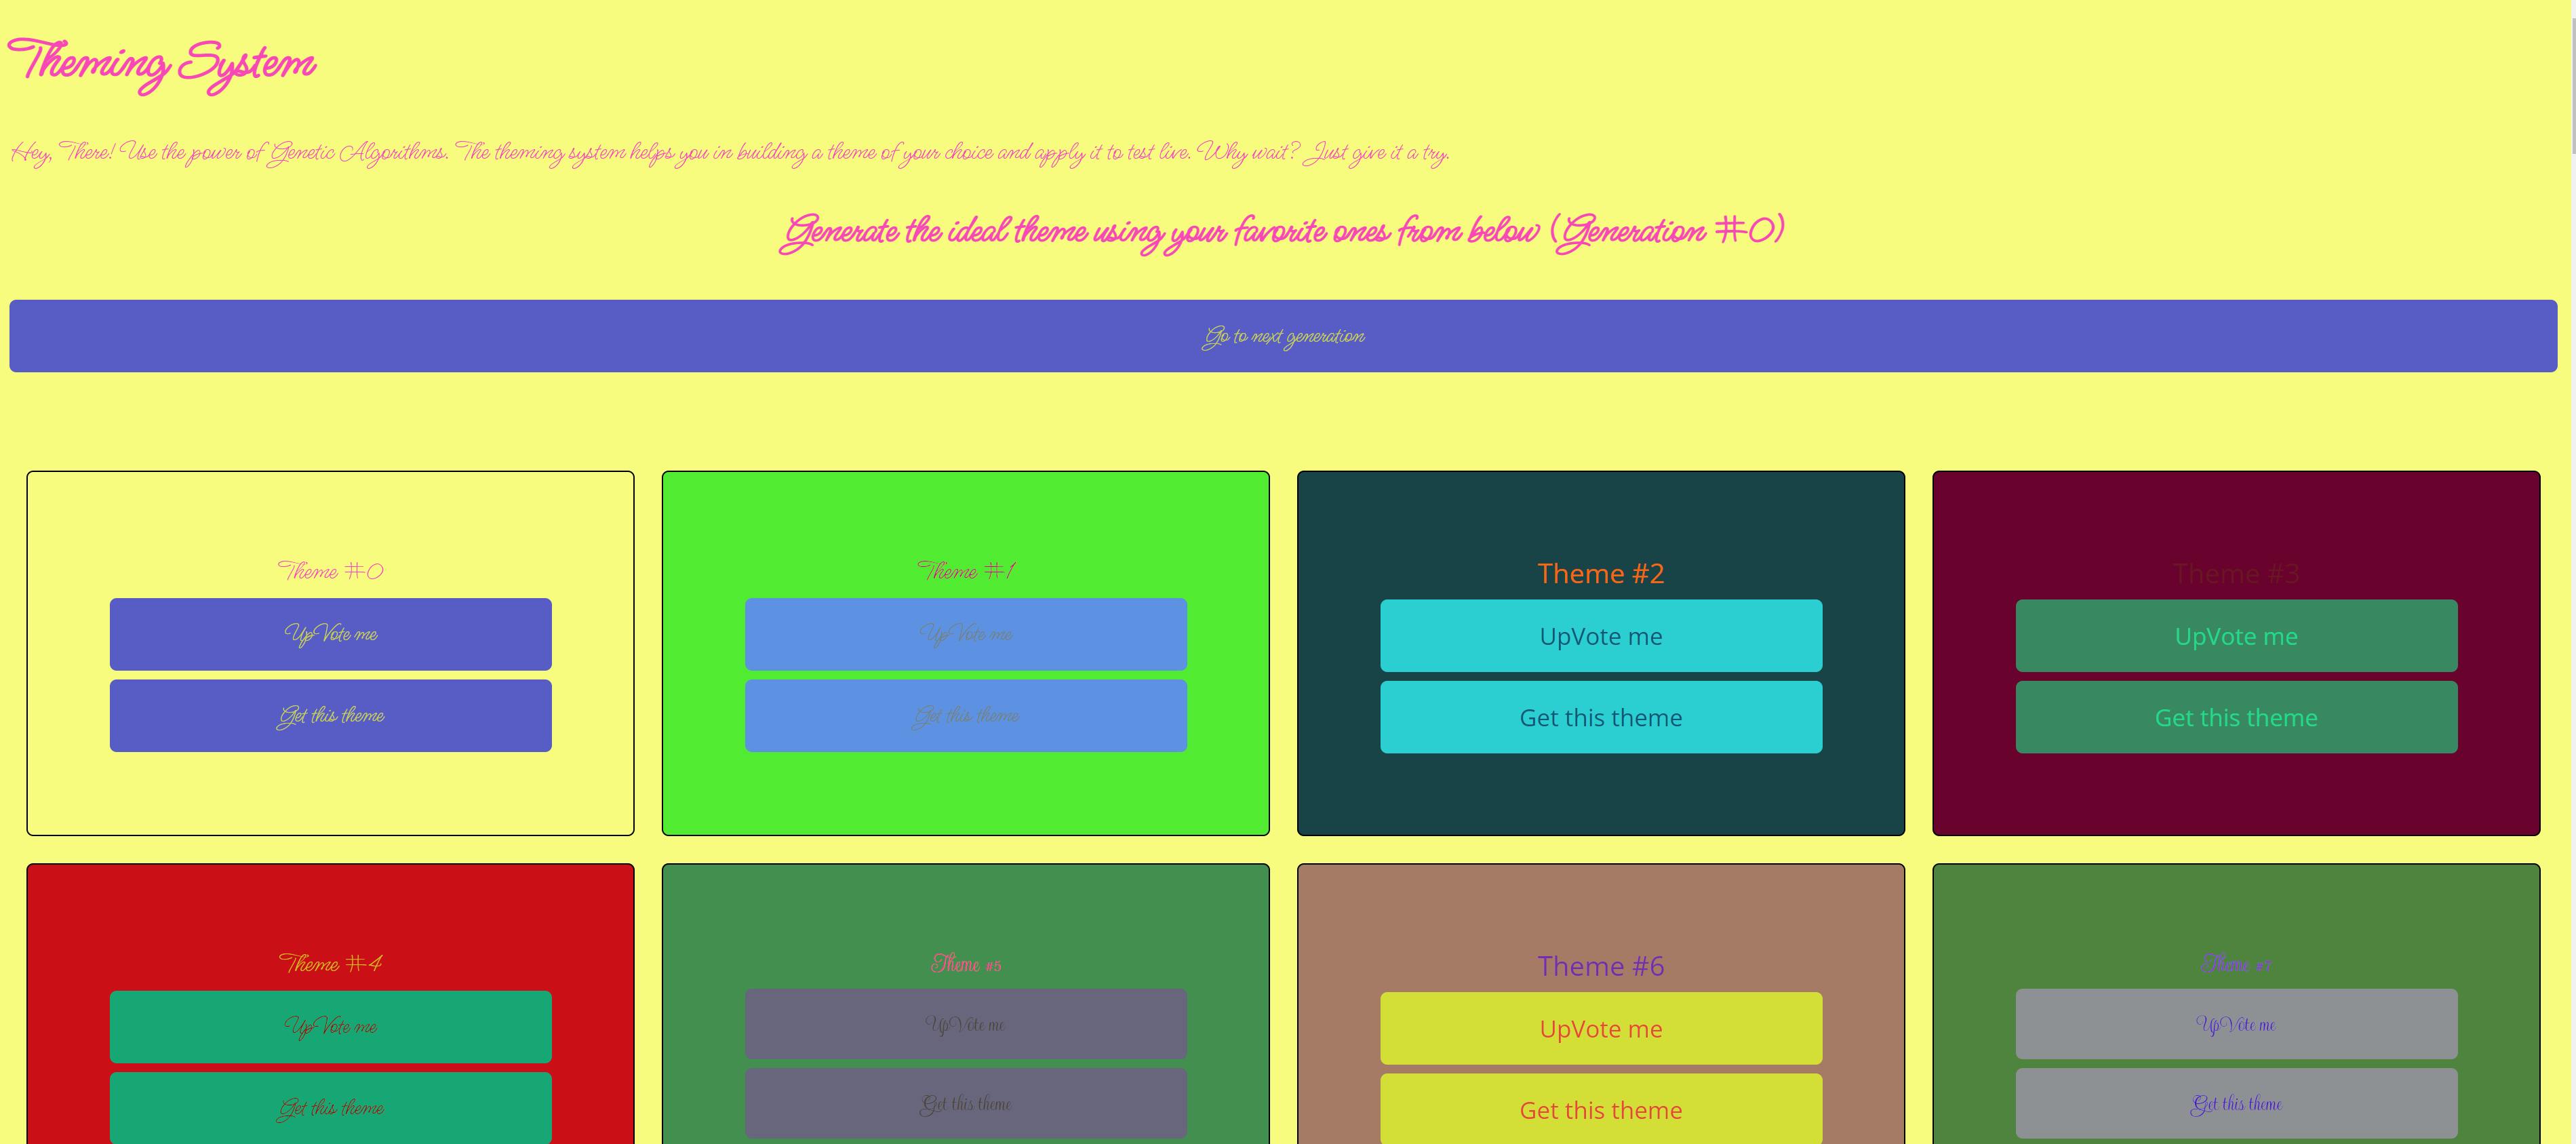
Each mini-theme (the small boxes with 2 buttons) will have 2 buttons:
- One to up-vote it, meaning we liked it so the algorithm should consider it an ideal "goal"
- One to output the theme's configuration into the console.
Let's keep going, I'll show you an animation of the whole page working at the end (along with a link to try it yourself).
The whole concept behind this application is that it'll show you 100 random mini-themes for you to pick from. Out of those, you, as a user, will up-vote the ones you like. After that, you'll have a button to "Move to the next generation" which will begin the process of:
- Calculating the distance between every non-upvoted theme and your picks.
- Turning that distance into a score
- Sorting the themes by score
- Breeding the top 50 themes and discarding everything else.
- Keeping the new 25 offspring and generating 75 new random themes
- Showing you the results.
So let's take a closer look at some of those steps.
Calculating the distance between themes
The first thing we need to figure out, is how to tell when a theme is similar to another one. This will indicate to our algorithm how "close to fulfilling" the intended goal each theme is. Remember, the first thing we do, is to pick the "ideal" themes, which means we have something to base our assumptions on.
If we can say that out of 100 themes, the best-looking theme is Theme #4, then we'll calculate how close the other 99 themes are to it. How do we do that? Well, since the DNA of our themes is composed mostly of HEX colors, I found a way to calculate the distance between them: using the delta-e formula.
This is what a "theme" looks like for my algorithm BTW:
{
    "data" : {
        "light" : {
            "id": "T_001",
            "name": "Light",
            "colors": {
                "body": "#FFFFFF",
                "text": "#000000",
                "button": {
                    "text": "#FFFFFF",
                    "background": "#000000"
                },
                "link": {
                    "text": "teal",
                    "opacity": 1
                }
            },
            "font": "#eeeeee"
        }
    }
}
The Delta-e formula allows you to measure how "similar" two colors are to each other based on their visual representation (in other words, it's a way to quantify what we see with our eyes). And lucky for me, there is an NPM packagethat implements it already, so I'm using that one. And so, my algorithm to calculate the distance between two themes is the following:
export function getColorDistance(a, b) {
    let colorsA = a.match(/#([A-Z0-9]{2})([A-Z0-9]{2})([A-Z0-9]{2})/i)
    let colorsB = b.match(/#([A-Z0-9]{2})([A-Z0-9]{2})([A-Z0-9]{2})/i)

    colorsA = colorsA.slice(1).map( c => parseInt(c, 16))
    colorsB = colorsB.slice(1).map( c => parseInt(c, 16))

    let distance = DeltaE.getDeltaE00({L: colorsA[0], A: colorsA[1], B: colorsA[2]},
                                {L: colorsB[0], A: colorsB[1], B: colorsB[2]},
    )
    return distance
}

export function getDistance(theme, ideal) {
    return getColorDistance(theme.colors.body, ideal.colors.body) +
    getColorDistance(theme.colors.button.text, ideal.colors.button.text) +
    getColorDistance(theme.colors.button.background, ideal.colors.button.background) +
    getColorDistance(theme.colors.link.text, ideal.colors.link.text) +
    ((theme.font != ideal.font) ? 10 : 0);
}
In other words, I'm adding the distances between all colors and plus 10 if we're also not using the same font. That is all I need, this makes sure that if I have 2 very similar-looking themes the number will be relatively low, and if they are different then the number will be higher. In fact, the higher the number, the more different these themes will be. And with that in mind, I'll calculate the score of each theme as follows:
export function getThemeScore(theme, ideals) {
    let score = 0;

    score = ideals.reduce((prev, curr) => prev + getDistance(theme, curr), score)
    if(score === 0) return 0.0001
    return score;
}

export const calculateDistances = (picks, rest) => {
    let withScores = picks.map( p => {
        p.score = MAX_SCORE;
        return p;
    })
    withScores = [...withScores, ...(rest.map( r => {
        r.score = 1/getThemeScore(r, picks) //the further the distance the lower the score
        return r;
    }))]

    return withScores
}
Let's first look at the calculateDistances function. This function calculates the distance between each non-picked theme and all the "ideal" picks, and then turns that distance into a score. How does it do that? Well, quite simple: if we're considering a high distance to be a bad thing, but we consider a high score to be a good sign, the score is calculated as follows: 1 / distance
That way the smaller (closer) the distance, the higher the score will be. And the higher the distance (further apart) the lower the final score will be.
This function returns a new array with all the scores calculated. And the getThemeScore function calculates the distance between a single theme and all the ideal ones. It does that by adding all distances together (thus the use of the reduce method). This way if the user selects multiple themes as "ideal" we can still find a way to determine how close each theme is to the group.
With the scores settled, we just need to sort them and breed the top 50. So let's take a look at that.
Sorting and breeding
As we all know, JavaScript allows for a custom callback on the sort method, so I'm using that to quickly sort my 100 elements array:
newData = newData.sort((a, b) => b.score - a.score )
That's all it takes, this will sort my elements in descending order which is what I want, I want the themes with the highest score to be at the start of the array.
let top50 = newData.slice(0, 50)
Now with my TOP50 selected, it's party time.
export function makeBaby(f, m, i) {
    let baby = {
        "id": uuid(),
        "good_this_generation": false,
        "score": 0,
        "name": "Baby #" + i,
        "colors": {
            "body": crossGenes(f.colors.body, m.colors.body),
            "text": crossGenes(f.colors.text, m.colors.text),
            "button": {
                "text": crossGenes(f.colors.button.text, m.colors.button.text),
                "background": crossGenes(f.colors.button.background, m.colors.button.background),
            },
            "link": {
                "text": crossGenes(f.colors.link.text, m.colors.link.text),
                "opacity": 1
            }
        },
        "font": Math.random() > 0.5 ? f.font: m.font
    }
    return baby;
}

export function breedPopulation(parents) {
    let parentsA = parents.slice(0, 25)
    let parentsB = parents.slice(25, 50);

    let offsprings = parentsA.map( (f, idx) => {
        return makeBaby(f, parentsB[idx], idx)
    })
    return offsprings
}
The breedPopulation function will be called with the TOP50, and it'll take care of splitting that list in half and then breed each theme of the first group with its partner from the other group (using the index to determine who the partner is).
The aptly named makeBaby function simply returns a new theme randomly picking the "genes" from one of the parents. The crossGene function is quite simple, but it's also the one in charge of deciding one important factor: if there needs to be a mutation in the breeding process or not:
function crossGenes(f, m) {
    let value = Math.random() > 0.5 ? f : m;
    if(Math.random() > (1 - MUTATION_RATE)) { //mutate
        return getRandomHexColor()
    }
    return value;
}
If the numbers decide that there should be a mutation, then a new random color will be generated. This is to make sure that we're not stagnating our breeding process. A high MUTATION_RATE will cause the population to be too random all the time, and a low one might not be impactful enough, so you'll have to tune it to your own use case. I've found that somewhere between a 5-10% mutation rate is more than enough.
And that's it, with the new set of offspring generated, all there is left to do, is to drop the "unworthy" and fill in the rest with more random themes.
The final step
The last 2 steps, killing off the dying population and generating a new set of potential themes are easily done with the following code:
let newPopulation = breedPopulation(top50)

let newRandomPopulation = generateRandomPopulation(75)
return [...newPopulation, ...Object.values(newRandomPopulation.data)]
These are the last lines of the goToNextGeneration function, which you'll be able to check out entirely on the repo. This function orchestrates everything I've been describing until now.
So after getting the offspring in newPopulation, I get 75 new ones from the call to generateRandomPopulation and then I return the merging of both arrays. This ensures that the old population is killed off, since I'm always returning new arrays (I'm never mutating the list of themes, which keeps the whole process a lot cleaner, say "no" to side-effects!).
And that's it, there is nothing else to understand from the algorithm itself, since I'm using a "functional approach" in the sense that I'm not mutating any data structure (especially the list of themes), simply returning a new list to overwrite the old one, I don't have to worry about them anymore, they're the responsibility of JS's garbage collector now.
But let's end the article by taking a look at how to put all of the above into Tapa's theme-selector project.
Butchering a React project
As I mentioned before, the "template" I used for my project was this one. This project allows you to create your own themes using a custom Dialog component and lets you see how it would look like using a custom hook called useTheme.
I got rid of the Dialog component, since I'm not letting anyone create anything, and I butchered the ThemeSelector component, which was meant to only list a few themes and let you apply one to the page. Now it lists 100 themes, and lets you control the entire process by:
- Up-voting themes
- Moving into the next generation
- Printing out a theme's DNA into the console.
This is what the component used to look like:
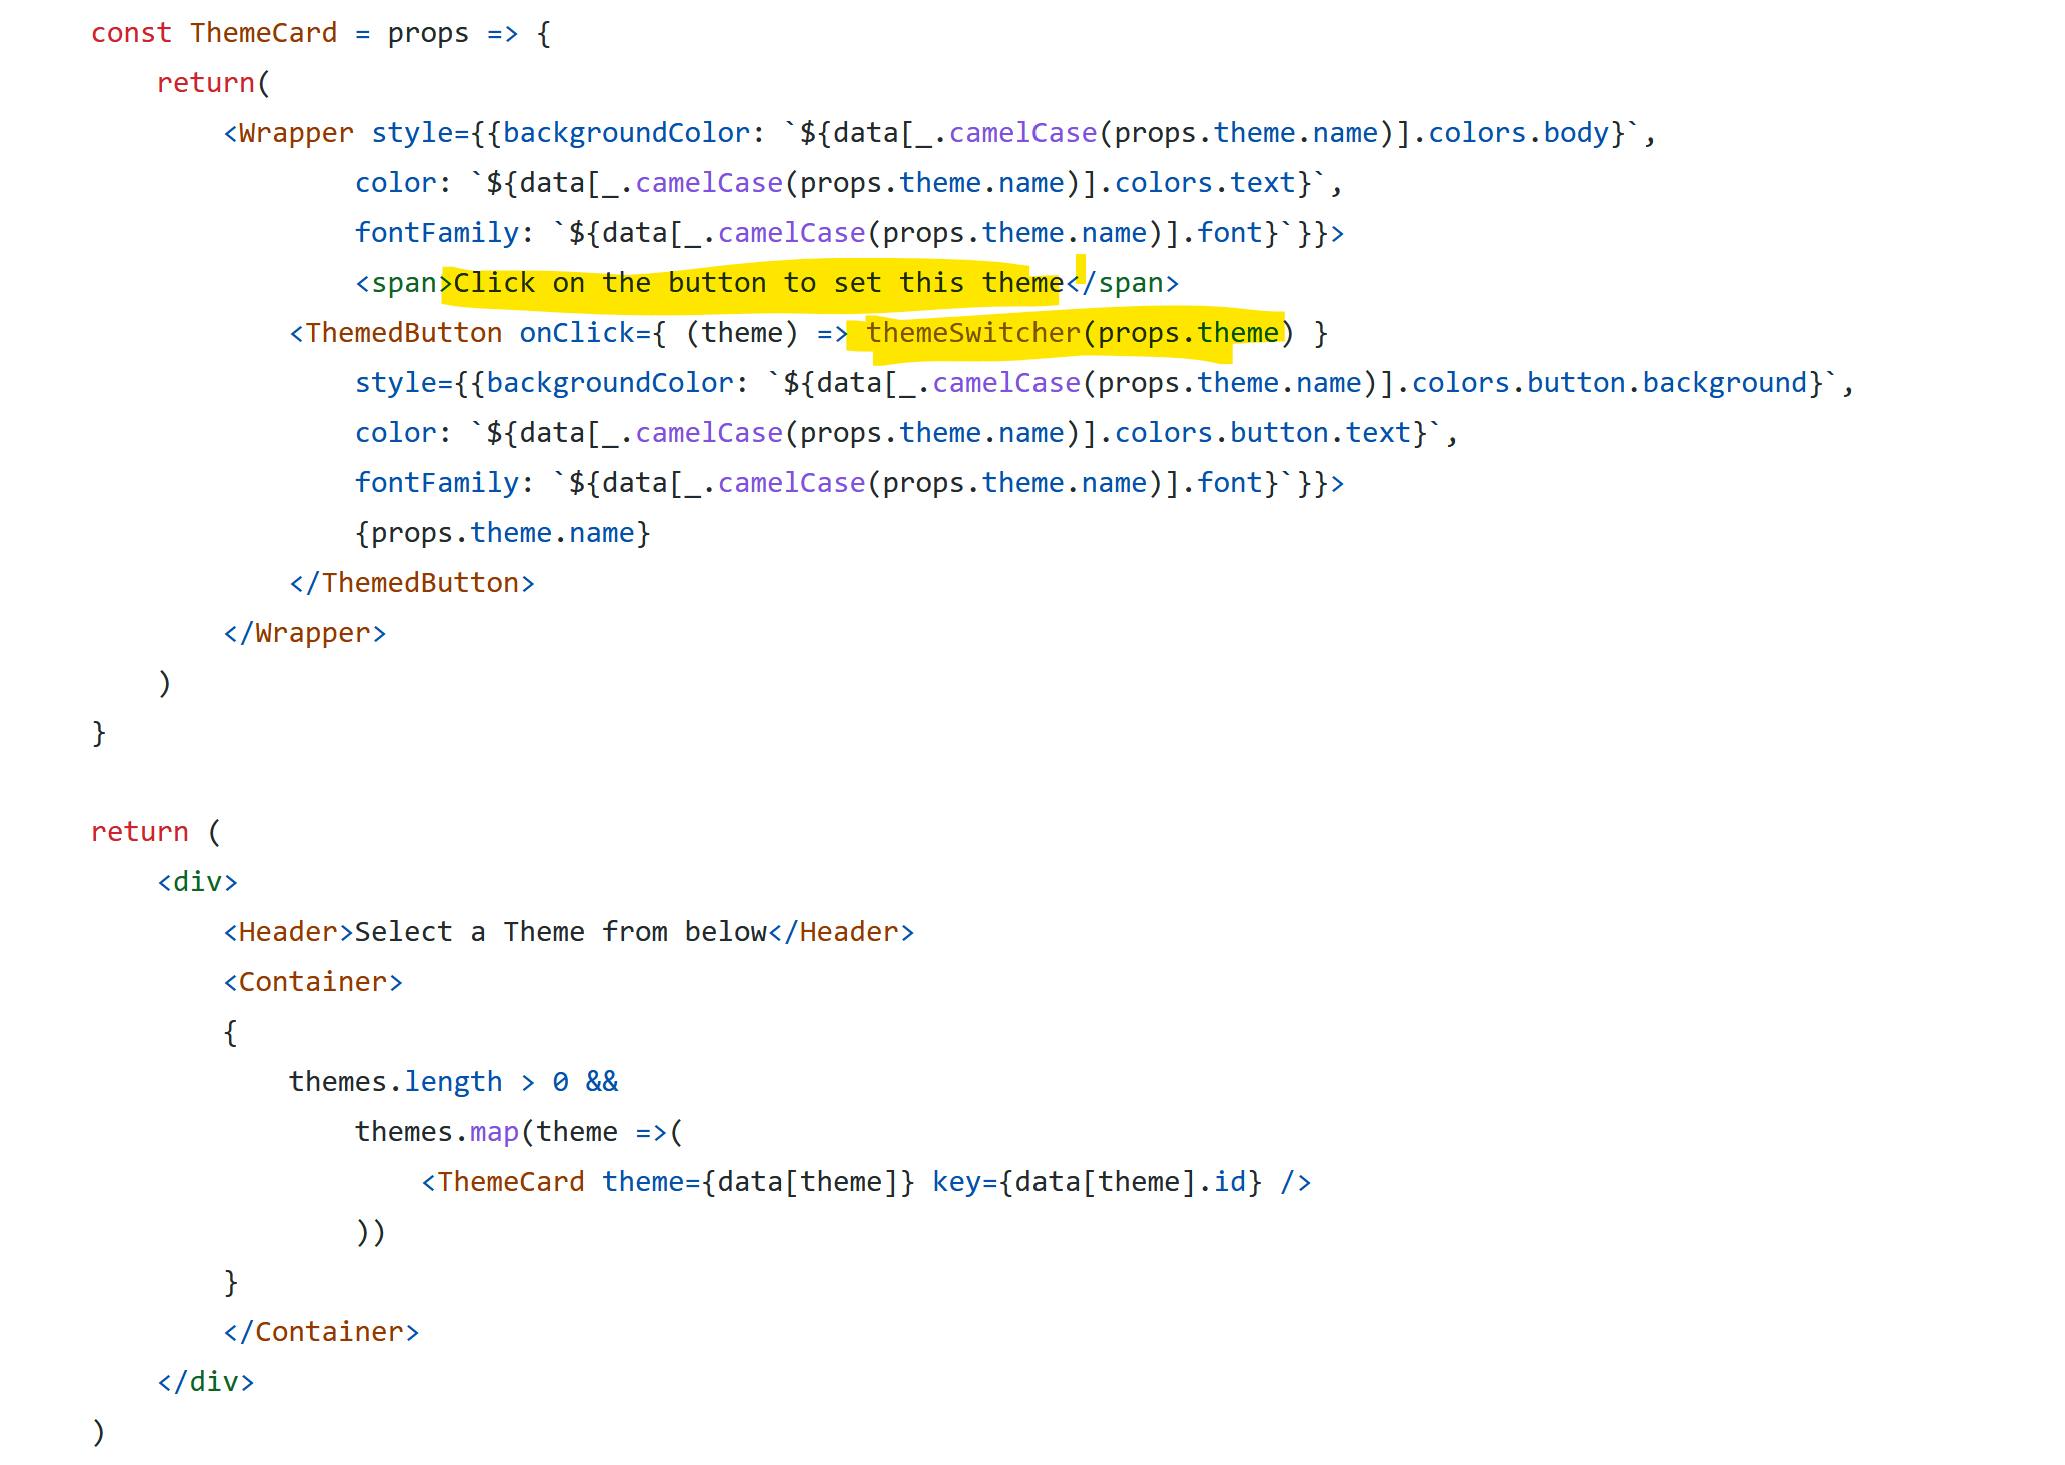
This is what the new one looks like (sorry Tapas!):
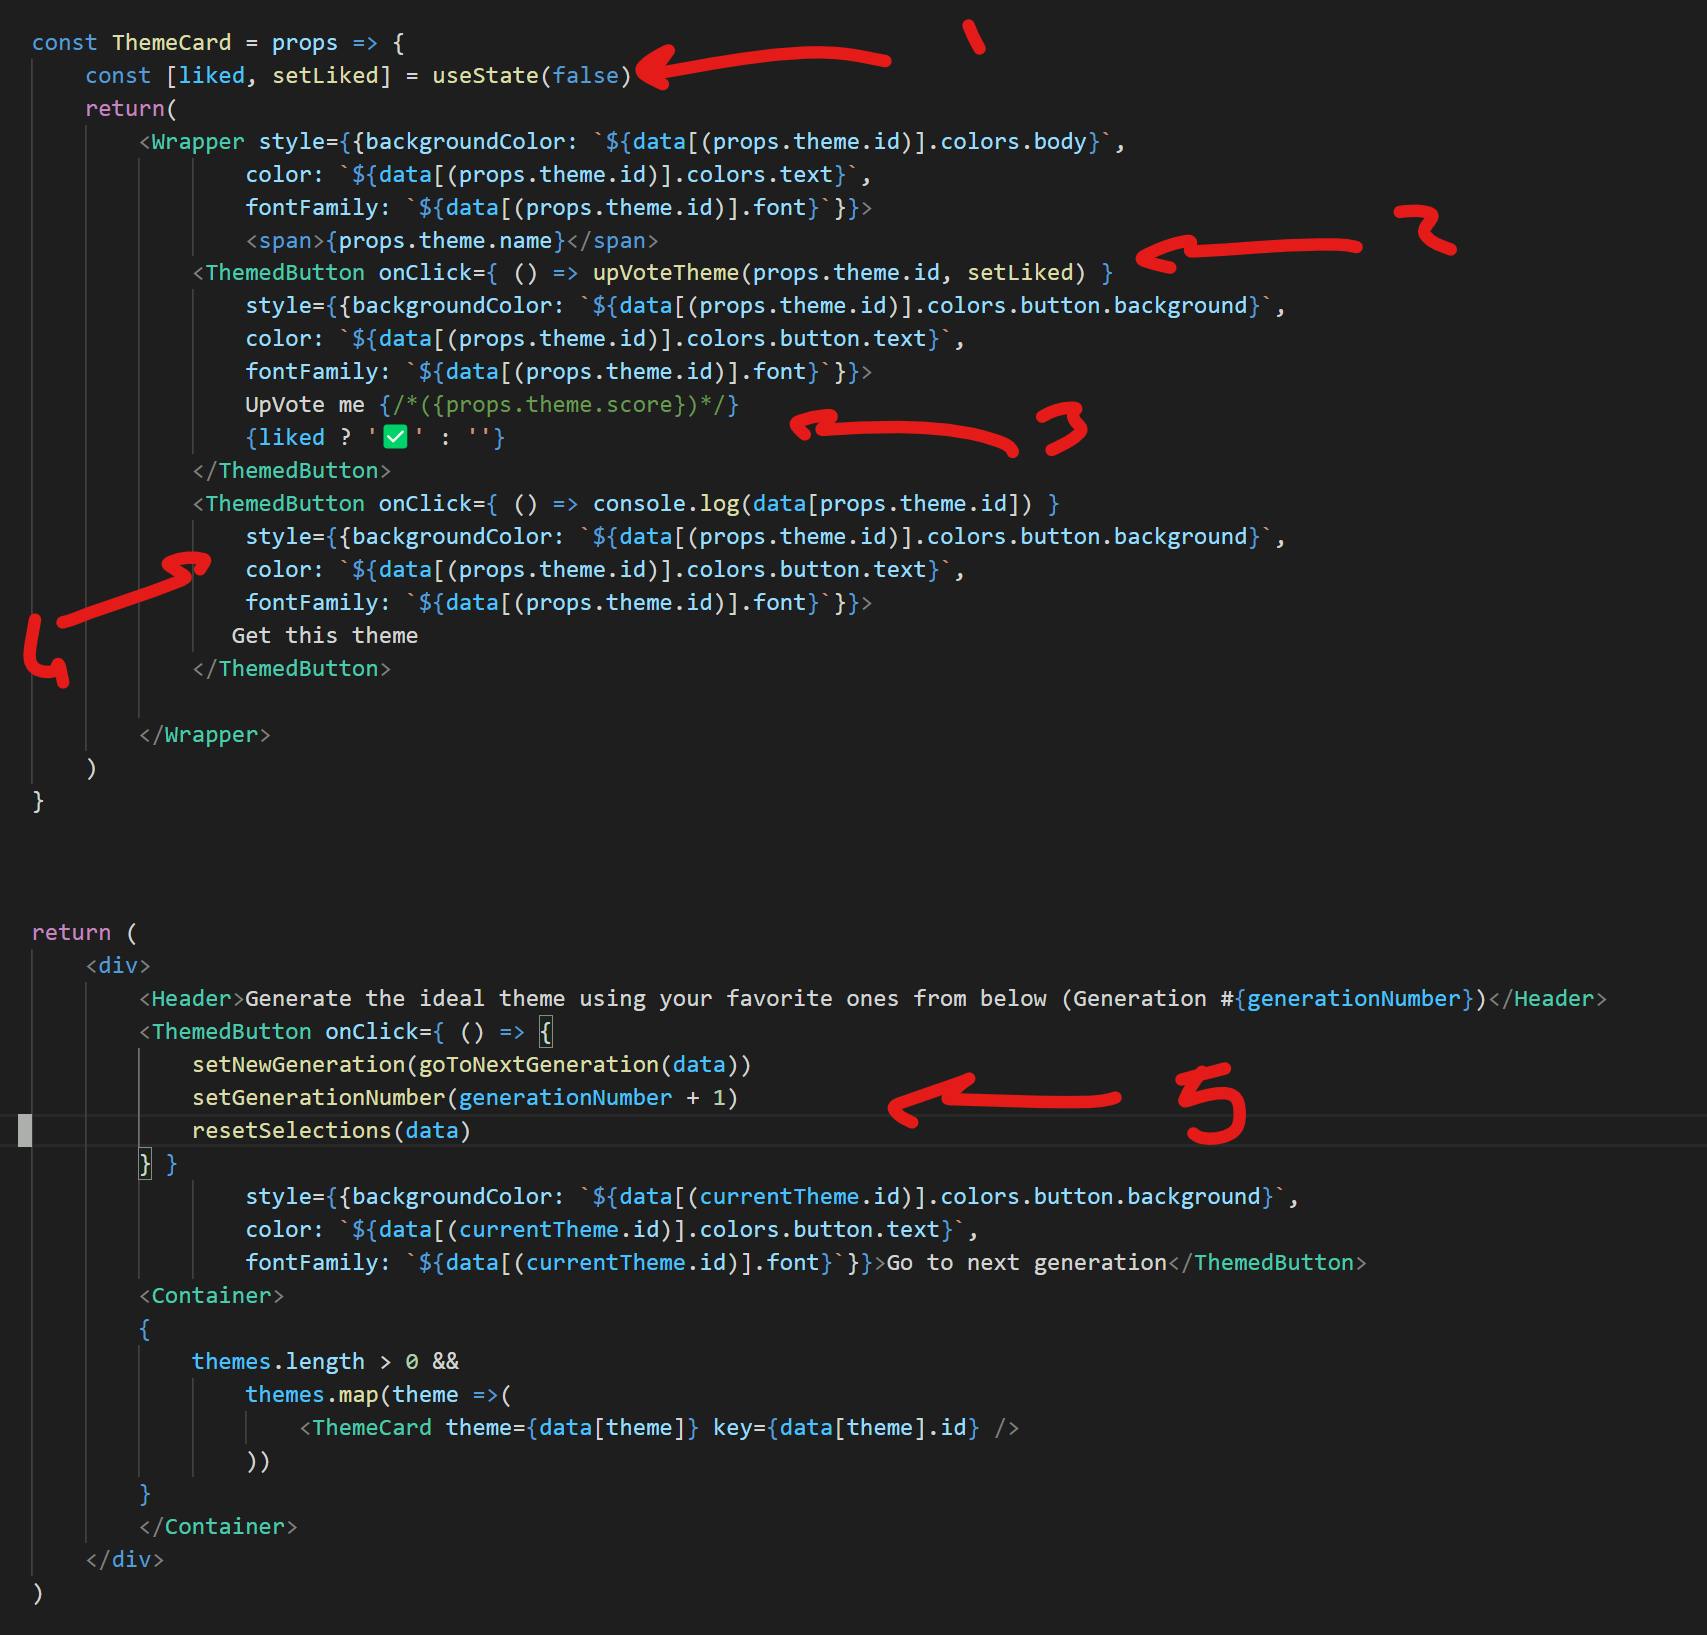
I've added:
- A new internal state to show when it's been selected
- The ability to up-vote a theme
- The visual representation of the internal state
- The new button to output the theme's DNA into the console.
- The new button at the bottom to trigger the move to the next generation.
Out of all those changes, the interesting bit is in #5, since that's where the whole process starts.
And while I already mentioned everything worth looking at inside goToNextGeneration, I want to quickly discuss what happens to its resulting value.
Updating the visual representation of the themes
As a result of the entire breeding process, I generate a new array of 100 themes. What happens next? As you can see from the screenshot above, step 5 is the following:
  <ThemedButton onClick={ () => {
                setNewGeneration(goToNextGeneration(data))
                setGenerationNumber(generationNumber + 1)
                resetSelections(data)
            } }
//...more core here
I'm first calling setNewGeneration which is simply a setter for the newGeneration local state variable where I save the new array of themes.
I then move to update the generationNumber local state, which I use as an indicator in my rendered text, but I also use it for something else, I use it as a trigger for a useEffect callback I haven't shown so far.
Finally, I call the resetSelection which simply down-votes all previously up-voted themes.
Now, the important part here is the update of the generationNumber local state variable, because as part of this component I also have this code:
    useEffect(() => {
        if(generationNumber == 0) return
        let newData = {}
        newGeneration.forEach( t => {
            newData[t.id] = t
        })

        setCurrentTheme(newGeneration[0])
        setData(newData)
        setThemes(Object.keys(newData))
    }, [generationNumber]
As you may, or may not know, when you pass an array of variables to useEffect, the callback will only be triggered when these variables change. Thus I'm taking advantage of that behavior to trigger a very important update process.
I need to update the data and the themes local state variables, which are the ones the component is using to display the entire list of themes.
But since I have an array of themes in newGeneration and these variables are an object (data) and a list of ids (themes) I have to transform my structure accordingly.
As you can see the process isn't that complex, but it's needed to get the results to show, otherwise nothing would change on the screen.
And for the grand finale, here is a video of the app working:
And you can play around with it here
The full code can be seen from the Github repo, over here.
This was a little fun experiment I thought I'd try and I really liked the result. Will you find it useful? That's up to you to find out, and hopefully, let me know, 'cause I'd love to know! Truth be told, the aim of this article was half about covering genetic algorithms and half about showing how I go about running experiments. It's just like my tests with Svelte, I like to hack things that are already existing instead of starting from scratch, I think that's a great way to save time and learn by reverse engineering something that works already. Plus, it makes me feel like a "hacker" (with lots of quotes, of course).
Anyway, I hope you found this article, at least a tinsy bit useful, and if you did, please leave a comment, I always love to hear from readers!