
Learn Svelte by Writing Svelte – Using Side Projects To Learn a New Tech
This is my process to learning a new tech

Hi there! I'm Fernando, Dev Advocate for OpenReplay and Tech Writer. I write books, publish articles and tweet about nerdy topics!
Everyone learns in different ways, some like to buy books and burn through them like a wildfire in the middle of summer, others like to watch YouTube videos until their eyes bleed, and then you have the ones that like to buy courses and watch tutorials until they can't remember their own names. It doesn't matter how you learn, not as long as you can avoid the dreaded "tutorial hell", that place which you might never leave if you're not careful. My trick to avoiding tutorial hell is to never enter it in the first place. I learn by doing, that's me, and it might be you, so I wanted to share the process I went through for learning the basics about Svelte without watching a single tutorial and keeping it fun and interesting at the same time.
I built a Wordle clone, well, sort of
It's not a full clone because that was never my intention, instead I wanted to build "NPMle" which is the silly name I gave my creation: a wordle-like game that forces you to guess a different NPM package name every day. Fun, right?
Here is what the end project looks like:
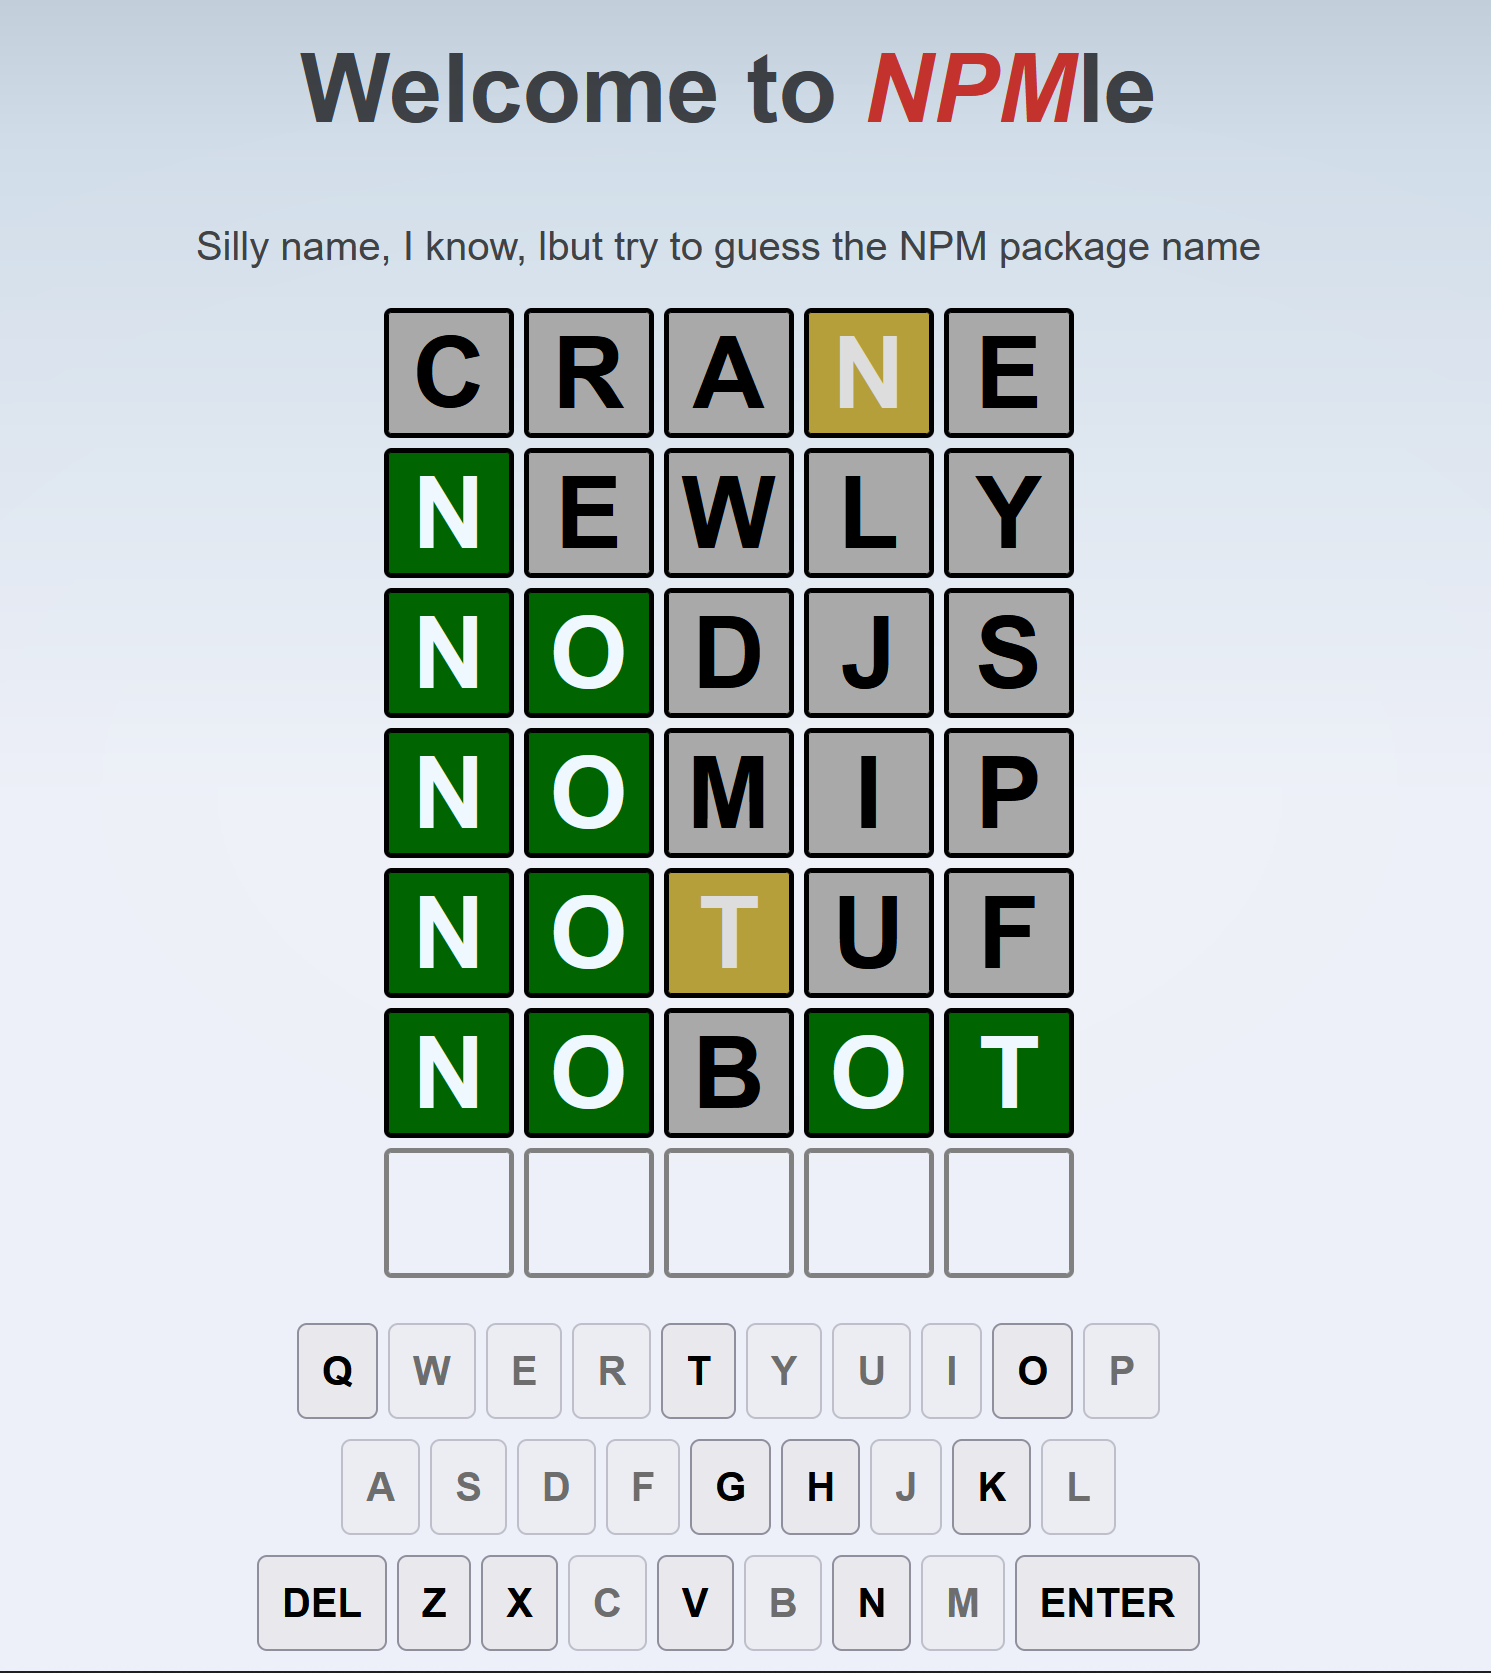
I'll let you decide for yourself if it's fun or not when you try it, but let's get down to business. The whole point of doing this was to learn Svelte, I had been reading about it for a while, and I even interviewed two guests on my podcast (20MinJS) about it. So my FOMO was peaking, I had to try it.
That said, I had some problems:
- I've not coded front-end in years. While I have been doing some JS on the side, that was always back-end, so I was (and still am) completely rusty when it came to writing the HTML and the CSS for it.
- My background in front-end frameworks is limited to the few articles I've written about React in the past few years. That is to say, I never really created a full project with it, I was just testing stuff around.
- I had a basic idea of how I wanted to deal with the back-end (getting the actual word each day) but at the same time, I knew that Netlify doesn't allow any back-end code, so I had to get creative.
The first two points really worried me, because they had the potential to kill the mood. That meant I had to keep things practical and move fast so I could start focusing on the actual interesting part: writing Svelte code.
Getting started
The first thing I did was to solve problem 3, the back-end. Essentially my plan was:
- Get the list of packages from NPM
- Filter the names to make sure they were easy and valid (meaning, they only had alphabetic characters and had 5 letters).
- Save each package name inside a different file. Each file would be named after the timestamp of the date that the word was assigned to.
- And to keep it interesting, the name would be encoded so checking the network tab of your favorite dev tool for the actual request would not yield that day's word. At least not in plain text anyway.
The code ended up looking like this:
const names = require("all-the-package-names")
                .filter(name => name.indexOf("@") == -1)
                .filter(name => !name.match(/[0-9]/))
                .map(name => {
                    if(name.indexOf("/") != -1){
                        let parts = name.split("/")
                        return parts[parts.length - 1]
                    }
                    return name
                })
                .filter(name => name.length == 5 && name.indexOf("-") == -1)

const uniqueNames = [...(new Set(names.map(n => n.toLowerCase())))]
                    .map(n => {
                        return (Buffer(n)).toString('base64')
                    })

const fs = require("fs")

function getDate(idx) {
    let newdate = new Date()
    newdate.setHours(0,0,0,0)
    newdate.setDate(newdate.getDate() + idx)
    return newdate.getTime()
}

//shuffle the names and only get a year's worth of names
const words = uniqueNames.sort(() => (Math.random() > 0.5) ? 1 : -1).slice(0, 365)

words.forEach( (w, idx) => {
    console.log("Saving the word: ", w, "(", Buffer.from(w, 'base64').toString(), ")")
    let fname = getDate(idx)
    let fpath = './words/' + fname
    fs.writeFileSync(fpath, w)
});

console.log("Done...")
I used the all-the-package-names package, which claims to have an updated list of package names. Whether or not that was true, I only wanted 365 of them, so it was enough. With that, the front-end would then have to perform a request to a static file (ideally hosted on a CDN) using the timestamp of the current day.
Simple right? At least that's what I thought. Moving on to Svelte.
Now is where the fun started
I wanted to move quick, remember? So I opted for the SvelteKit option, which allowed me to generate a template app, much like create-react-app.
So the following lines were more than enough to get me going:
npm init svelte npmle
cd npmle
npm install
npm run dev
With that I started to butcher the app, I removed all unnecessary code from the index.svelte file and replaced it with the code I needed to draw the game board.
Since I wanted to move fast, I searched for a tutorial on how to create a Worlde clone, and just copy&pasted the HTML and the required CSS.
Is this ideal? Most likely not if you're hoping to learn about HTML and CSS, but I was laser-focused on Svelte, remember that.
So after copy&pasting that code, I turned it into a Svelte component and encapsulated the logic inside it. Things like drawing the board, capturing the user's input and making the grid show the results of each attempt. That was all coded here.
This component is basically, the main section of the game. Most of the logic happens here. After that I needed to create the modal windows that would show either your success or your failure. And while I will not go into details about each modal, the interesting bit here is the communication between the board and the modals. In other words, how to share state between components in Svelte.
Getting components to communicate
All modals and the gameboard can be considered sibling components, meaning that they don't have a direct parent-child connection. So sending messages between them requires the use of Event Distpachers.
Through event dispatchers, you can send events up the hierarchy. You have to manually bind functions to each event but since those functions are defined outside the component itself, it gives you a way to trigger logic to orchestrate the communication between different elements of your app.
For example, the gameboard would trigger the userWon event with the following code:
let dispatch = createEventDispatcher()

function validWord() {
    dispatch("userWon", {
      tries: currentGuess + 1,
      word: word
    })
  }
And in the index.svelte file, when I use the Gameboard component, I bind my function to that event through this code:
<Gameboard word={word} on:userWon={handleUserWinning} on:gameOver={handleGameOver}/>
The handleUserWinning function captures the correct data and acts accordingly.
This is a very clean and simple way to communicate between components and allows you to decouple them from each other. This is a very important aspect to consider when designing components (that is in any language/framework to be honest).
Handling game state with stores
As you can imagine, the state is key to this application, since I needed to know things like:
- What is the current word I'm trying to guess?
- How many attempts have I used today?
- Did I manage to guess the word? Or have I exhausted all attempts for the day?
- What is the status of all of my attempts?
These are all questions that many different parts of the game need to be aware of, so I'm using a store for this. A store in Svelte is essentially in-memory storage that you can subscribe to, so whenever something changes your components can react to the new data. To create a store in Svelte you actually need to create a JavaScript (.js) file, take a look at how easy it is to define a store:
import { writable } from 'svelte/store';

export const gameState = writable({
    lastgame: 0,
    wins: 0,
    loses: 0,
    word: "",
    attempts: 0,
    alreadyPlayed: false,
    attemptsStatus: []
})
That's all it takes, you define the scheme of your state, and then you can read it and update it like so:
import {gameState} from '$lib/store.js'

if($gameState.lastgame == todaytimeStamp) {
   alreadyPlayed = true;
   $gameState.alreadyPlayed = true;
   showEndGameModal = true;
}
Notice how I prepended the gameState variable with a $, that's a shorthand syntax to specify that the code is reactive. You could use the get and update methods without the $, but this way it's a lot shorter and more declarative syntax.
Whenever I update the content of the store, any piece of code reading it get's executed. Without me having to do anything else.
Magic! Or rather, Svelte!
Keeping the virtual keyboard updated with stores
Every time you try a solution, the failed letters need to be disabled from the virtual keyboard under the board.
Now, we could find a way to get the gameboard component to send messages to the keyboard component. However, we can easily use a store for that. I created a secondary store that only captures the failed characters (i.e the ones the player uses and are incorrect). Whenever I validate a potential solution, I'll add all the failed ones into this store. And each letter of the keyboard has this code:
 import {failedChars} from './store.js'

<button class="keyboard-button" disabled={$failedChars.includes('q')} on:click={synthInput}>q</button>
Notice how the disabled property is updated every time the failedChars store is updated as well. We don't need to do anything else, through this store both components can communicate without any extra logic.
And if you're wondering what's the content of the synthInput function, here is how I managed to generate fake input events when clicking on these buttons:
function synthInput() {
    console.log(this.innerHTML)
    document.dispatchEvent(new KeyboardEvent('keydown', {
      key: this.innerHTML
    }))
  }
The code captures the letter inside the button and uses that as the key property for the keydown event.
We now have to worry about one more thing, and that is persisting the state after the app is closed. And for that we can simply use cookies.
Persisting the game state in a cookie
Since my state is not that complex, I can save the whole thing inside a cookie. Now, there is no specific way of dealing with cookies in Svelte, so again I just copy&pasted some basic cookie handling code from StackOverflow. Nothing fancy, just a function to set the cookie and one to read it. You can get the code from here.
Now, every time I end the game, either by winning or by losing, I'll overwrite the cookie with the content of the current state. That includes that last date I played, so I can check for it next time.
Also, whenever the game starts, I'll load the cookie and update the store with its content.
I can do that with a special onMount function on my index.svelte, which gets called once the component is added to the DOM.
onMount(async () => {
   loadCookie()
   await getWord()
})
Simple, yet it works.
Solving the CDN problem
The last part of my puzzle was getting the word for each new day. Remember I told you, I wanted to save my individual files inside a CDN right? Well, after doing some research I realized I had a perfect CDN for it already available: Github.
My word files are all inside a public repository, and my game logic will target the RAW path of the files and read the right one each day. Here's the getWord function for you:
async function getWord() {
        let today = (new Date())
        today.setHours(0,0,0,0)
        let todaytimeStamp = today.getTime() //getting today's timestamp for the URL

       //making sure we haven't played today
        if($gameState.lastgame == todaytimeStamp) {
            alreadyPlayed = true;
            $gameState.alreadyPlayed = true;
            showEndGameModal = true;
        }
        //this is the RAW Github URL
        const url = "https://raw.githubusercontent.com/deleteman/npmdle-word-generator/main/words/"
        const resp = await fetch(url + todaytimeStamp)
        let encodedWord = await resp.text()
        word = atob(encodedWord) //decode the content of the file
    }
No need to configure anything else, or worse, pay for a private CDN.
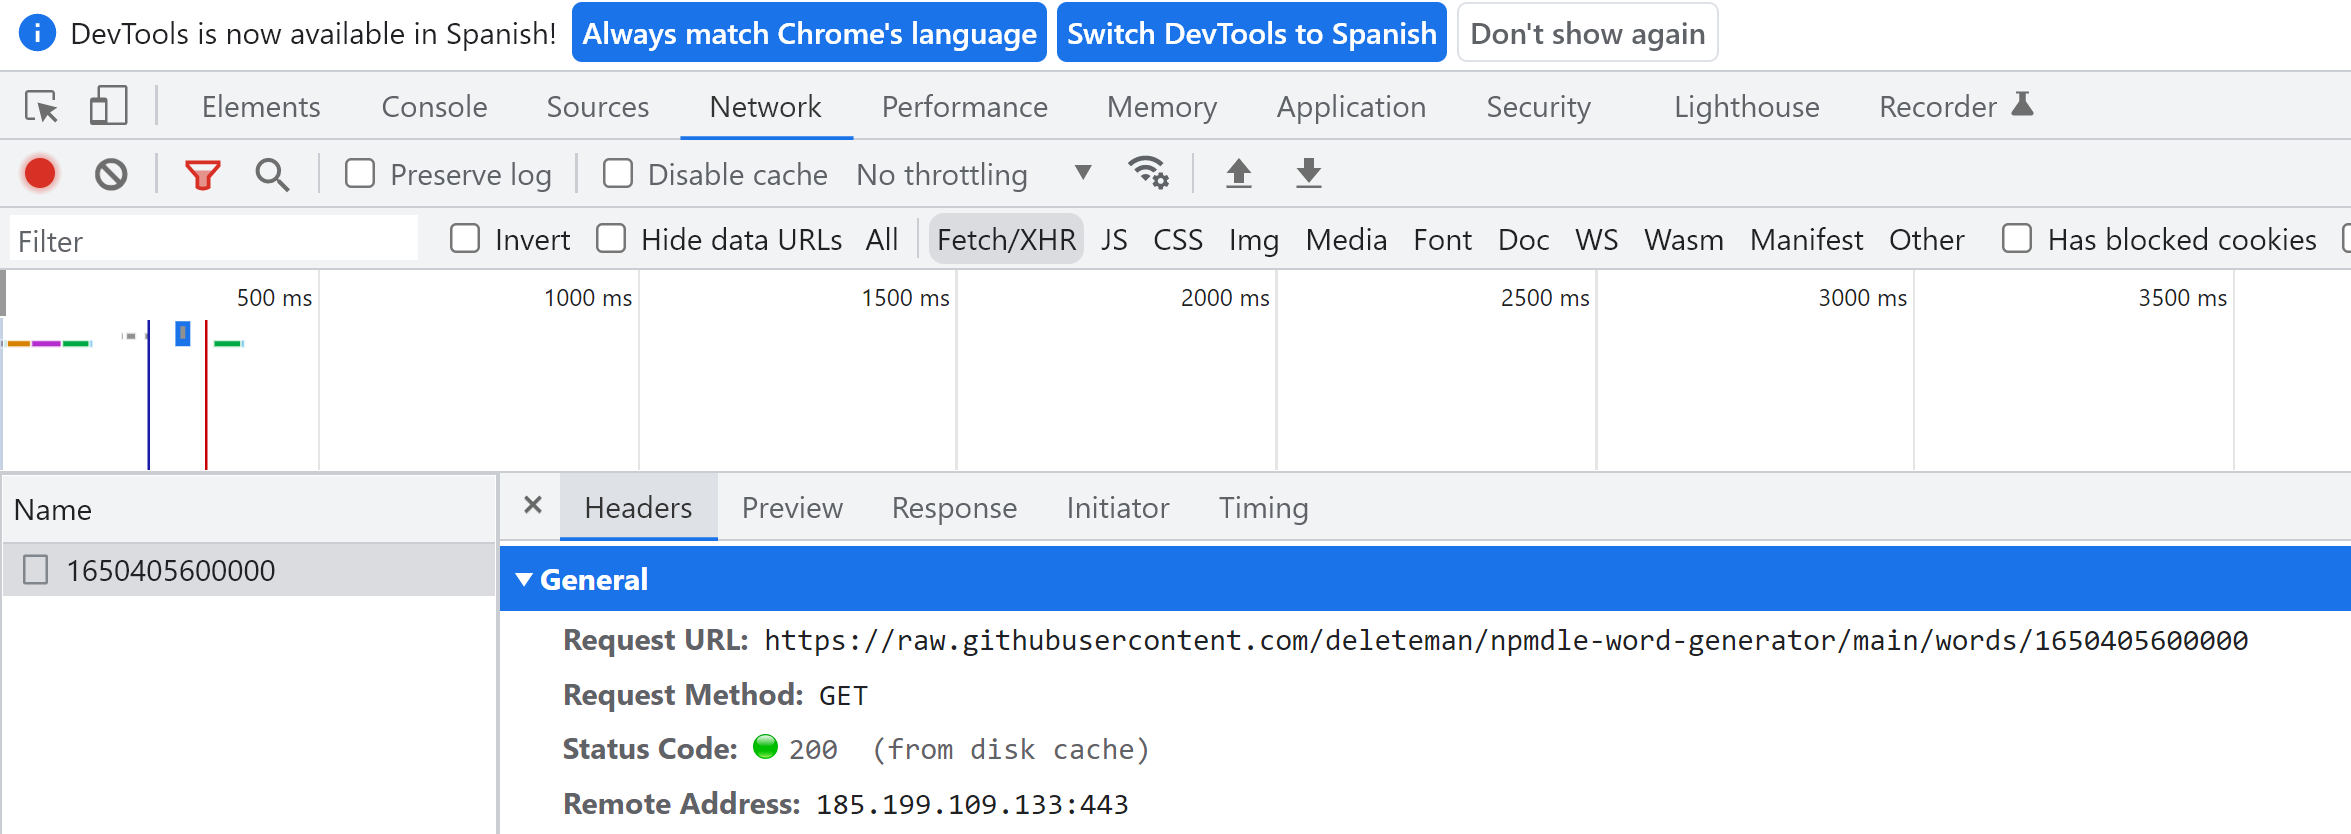
You can see the full URL being requested in the above screenshot. I don't know about you, but I'm really proud of this solution. Granted, I could've hardcoded the words in my code, but that way I can keep the "database" separate from the game logic. I could eventually create an API that responds to the same URL schema, and just change the host I use on the game code and the rest would keep on working.
The game itself is a lot bigger, but the gist of it, the Svelte logic, is covered here. It's all about stores, components and events. In conclusion, let's see what I ended up learning about Svelte:
- You can get started super quick with the SvelteKit generator.
- Components are independent of each other and only require you to write basic HTML, CSS (which gets isolated within the component) and some JavaScript.
- Boilerplates aren't needed, reactive code is natively supported.
- State management is trivial with stores.
- Sending information up the hierarchy is very intuitive and easy with event dispatchers.
And most importantly, I was able to move fast by skipping over the "other" parts, I focused only on what I was after, and took advantage of pre-written code for the others. You can go back to those parts you skipped later and learn about them at your own pace. It's all about managing priorities.
Overall the experience was challenging, I had to learn how to do a lot of things with Svelte, but the game works, and I still use it every day, even though I fail at it miserably. The code for the full game is available here. The code for the project that generates the words, is here.
And if you want to test the game, you can check it out here.
Feel free to reach out if you have any questions, I'd love to help out!


